The class, taught by two women at Twin Vixen Press, started right at the beginning with the preparation of the copper plate for etching. This included filing the edges to a 45 degree angle so that the roller on the press could easily catch the edge of the plate during printing. That part seemed tedious but I was assured that if I was doing it all the time I could use a belt sander! Once that was done it was on to sanding the plate to make sure the surface was smooth and free from marks that would show up in the print. Some do anyway but there are some lovely random accidents that happen in etching on occasion that I quite like.

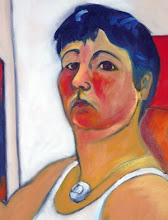
I had brought some images, as requested, to the workshop and after seeing the size of the plate I selected one of titled Undine from my Female Monsters series (part of my graduate thesis). It was a painting that I actually sold and so rather missed, but fortunately had a good digital photo of on my computer I could print. I then traced the outlines of the image onto tracing paper with dark graphite rich pencil. Next we put hard ground on the plate which is a sort of waxy medium that resists acid. Laying the tracing paper on the dried surface of the ground rubbing with your fingernail actually transfers the graphite drawing to the ground - then using an etching tool you just draw into the ground. You don't have to press hard or anything because you're not dry pointing etching into the copper. The acid bath will do the work.
After that I cleaned off the ground and prepared the plate for a quite test run - to see what I had made. It was pretty neat right away, but lacking in detail that would make the image stand out. I have always loved the quality of line in etching though. It seems to me that it just makes line so much more beautiful. After that I laid down a new hard ground in order to work more into the plate.
After that stage and seeing what the print looked like I then decided to try the aqua tint process. Basically they have this sand box where rosin is dusted onto the plate, then the plate is heated, and after it has completed cooled you can paint another medium onto the plate called stop out (I might remember that wrong) and block out areas you don't want the acid bath to etch. Aqua tint lays done these tiny specks and so when the plate is in the wash these little specks are eaten out of the copper plate. Varying degrees of timing produce lighter or darker tonal ranges. It's a cumulative process so you have to do a bit of arithmetic, working from your lights to your darks as you add more stop out (stop it?) to the plate until finally you feel you're done.
Then wash it all off again, apply the ink, and print. Amazing. I include a scan of my final print. I made quite a few of these today. I look forward to seeing one framed.
Just some final notes about the image: Undine is a mermaid but in keeping with the whole theme "Female Monsters" I was thinking about the early sailor stories that made out mermaids to be fearsome creatures luring sailors to their death. The body of the undine is a moray eel. She is swimming through kelp.


1 comment:
Thank you for sharing the etching process, I was fascinated:):)
Post a Comment